Top 10 Kitchen Floor Drain Options for Easy Installation
When choosing a Kitchen Floor Drain, options abound. A good floor drain is essential for maintaining clean and dry kitchen environments. It prevents water accumulation and minimizes slip hazards. With so many styles and features available, it can be overwhelming to find the right one.
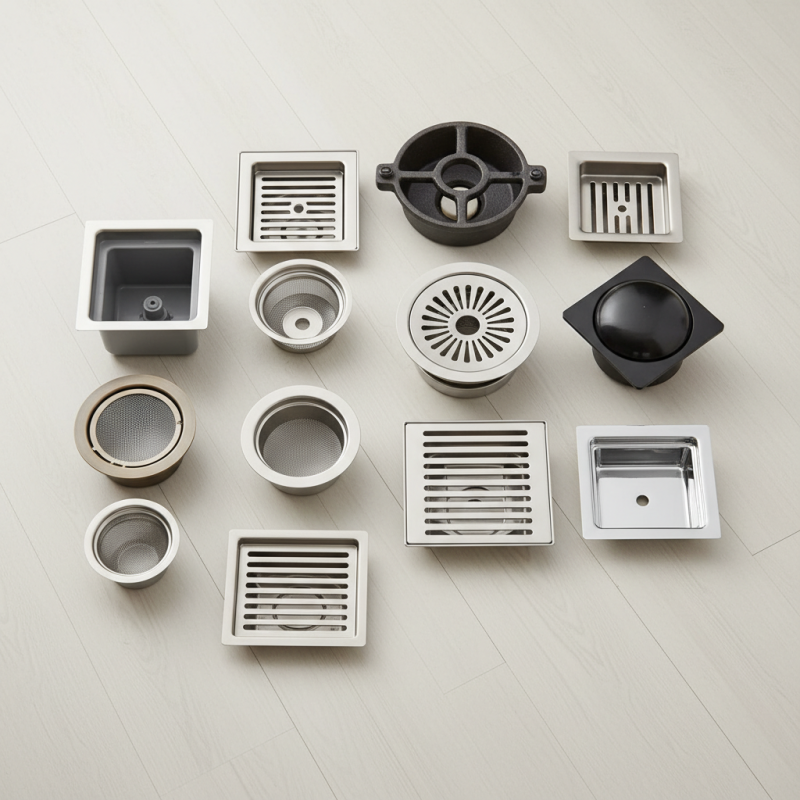
In this guide, we’ll explore the top 10 kitchen floor drain options that are easy to install. You’ll discover various designs, materials, and installation methods. Each option will be evaluated based on reliability and performance. Consider factors like size, drainage capacity, and ease of maintenance. A well-chosen Kitchen Floor Drain enhances both functionality and aesthetics.
Selecting an effective drain is not just about convenience. It’s a decision that impacts hygiene and safety. Mistakes in this area can lead to water damage or unpleasant odors. Therefore, it’s vital to reflect on the options and pick wisely. A thoughtful choice ensures your kitchen remains a safe and welcoming space.
Top Considerations for Choosing Kitchen Floor Drains
Choosing the right kitchen floor drain can significantly impact both functionality and aesthetics. According to industry reports, approximately 30% of homeowners overlook this aspect during kitchen renovations. This lack of attention often leads to operational issues, such as clogging and inefficient drainage. For effective drainage, consider a model that accommodates both heavy traffic and potential spills. Grate size and material durability are essential factors, as they affect long-term performance.
Another key consideration is the installation process. Ease of installation is paramount. Reports indicate that many DIY enthusiasts prefer drains that can be installed without professional help. Systems with simple designs and fewer parts tend to offer more straightforward setups. Additionally, understanding the local plumbing code can help avoid future complications.
Water flow capacity also plays a crucial role. The average kitchen can generate up to 2 gallons of water per minute during peak cooking times. A drain that cannot handle this volume will quickly become a headache. Therefore, researching flow rates is vital, even if it takes some additional time. Ultimately, the perfect kitchen floor drain should blend durability with effective water management, aligning with both your kitchen's design and your practical needs.
Top 10 Kitchen Floor Drain Options for Easy Installation
| Drain Type | Material | Installation Difficulty | Size (inches) | Price Range (USD) |
| Slot Drain | Stainless Steel | Easy | 36 | 150-250 |
| Grease Trap Drain | Plastic | Medium | 12 | 100-200 |
| Floor Sink | Cast Iron | Difficult | 20x20 | 120-300 |
| Trap Drain | PVC | Easy | 10 | 50-150 |
| Channel Drain | Stainless Steel | Medium | 60 | 200-350 |
| Wall Drain | Stainless Steel | Medium | 12 | 80-180 |
| Quadrant Drain | Copper | Difficult | 16 | 200-500 |
| Linear Drain | Stainless Steel | Easy | 48 | 150-300 |
| Multi-Purpose Drain | Aluminum | Medium | 24 | 100-250 |
| Curb Drain | Concrete | Difficult | 36 | 300-600 |
Types of Kitchen Floor Drains: A Comprehensive Overview
When choosing a kitchen floor drain, understanding the different types available is essential. There are several popular options. These include linear drains, point drains, and trench drains. Each type offers unique benefits for various kitchen layouts. For example, linear drains work well in open spaces and provide a modern aesthetic. Point drains, on the other hand, are suitable for smaller areas.
An important aspect is installation. Proper installation ensures long-term reliability. Misalignment can lead to standing water. It’s crucial to have the drain positioned correctly during installation. Measure the space accurately to avoid costly mistakes.
Tip: Always consult with a plumbing expert before making your final decision. They can guide you in selecting the best type based on your kitchen's design and functionality.
Maintenance should not be overlooked. Regular cleaning of the drain prevents clogs. Buildup can lead to unpleasant odors or slow drainage. If you notice any issues, addressing them quickly can save you from bigger problems down the line.
Tip: Use a drain cover to catch debris effectively. This simple addition can reduce the frequency of deep cleanings significantly.
Step-by-Step Guide to Installing Kitchen Floor Drains
Installing a kitchen floor drain can seem overwhelming. However, with the right steps, you can simplify the process. Begin by selecting the appropriate drain type for your kitchen. Consider the size and design that fits your space. Measure the area precisely to ensure a proper fit. As you gather tools, ensure you have a wrench, screws, and sealant on hand.
Next, it's essential to prepare the installation area. Clear debris and any old materials. Cut a hole in the floor that's slightly larger than your chosen drain. This ensures a snug and secure fit. Place the drain inside and check for levelness. It's crucial that water flows towards the drain and not away from it.
After positioning, secure the drain with screws. Use sealant around the edges to prevent leaks. Allow it to cure according to the manufacturer's instructions. Remember, achieving a quality installation often requires patience and attention to detail. If you notice uneven surfaces or shifting pipes during setup, address these issues before proceeding. Proper installation means fewer problems in the long run.
Maintenance Tips for Long-Lasting Kitchen Floor Drains
Maintaining kitchen floor drains is often overlooked, yet it's crucial for longevity. Regular cleaning can prevent clogs and odors. Once a week, remove any debris that might accumulate. Hair, food particles, and grease can quickly lead to issues. Use a gentle brush or cloth to clear the drain cover. Be cautious; over-scrubbing might damage the surface.
Consider using a mixture of baking soda and vinegar monthly. This natural solution helps break down buildup. Pour half a cup of baking soda into the drain, followed by half a cup of vinegar. Let it sit for 30 minutes, then flush with hot water. This method is effective and avoids harsh chemicals.
Don't ignore the signs of problems. If water drains slowly or smells bad, you need to take action. Regular maintenance prolongs the life of drains. A neglected drain can be chaotic and costly. Reflect on your habits. Are you cleaning regularly? Make it a part of your routine to ensure a clean and functional kitchen environment.
Common Mistakes to Avoid When Installing Kitchen Floor Drains
When installing kitchen floor drains, common mistakes can lead to serious issues. Many homeowners overlook the importance of proper slope in the drain area. The recommended slope is typically 1% to 2% towards the drain. The correct slope ensures efficient water flow and prevents pooling. Neglecting this can result in standing water, creating an environment for mold and unpleasant odors.
Another frequent error is the improper choice of drain size. According to industry reports, choosing a drain that is too small can cause clogs, especially in busy kitchens. A drain with a diameter of at least 4 inches is often suggested for optimal drainage. Many individuals also fail to consider the material of the drain, which can affect durability. Stainless steel is a popular choice due to its resistance to corrosion and easy cleaning.
It's crucial to ensure that all connections are sealed properly. Poor sealing can lead to leaks, further causing structural damage over time. Proper installation methods should be adhered to, including using the right adhesives and sealants. Failure to do this can result in costly repairs later. Regular inspections post-installation can help catch these mistakes early. Taking the time to follow these guidelines will lead to a more efficient and reliable kitchen drainage system.
Top 10 Kitchen Floor Drain Options - Installation Difficulty and Cost
 Skip to content